A Beginner’s Guide to Hiking the Narrows in Zion National Park
If you’re planning a trip to Zion National Park, you probably already know about Hiking the Narrows. It’s arguably one of the most famous hikes in the USA!
For those that don’t know, the Narrows is one of the many incredible hikes you can do in Zion National Park, of which there are many. But what makes the Narrows so special is that you get to hike through the Virgin River, which flows through the entire park and beyond.
Throughout different portions of the hike, you will be up to knee, thigh, or maybe even waist high water, depending on the time of year!
As you can imagine, this hike is not for *everyone*, and it certainly comes with its challenges. I tackled it with my best friend in 2021 during our One Week National Parks Road Trip. As someone with VERY little hiking experience (I’m more of a lay on the beach kinda girl), I was very nervous to hike the Narrows.
But I had seen so many incredible photos of people tackling it in the summertime, and I knew I had to try! So I did as much research as possible to make sure I was prepared. And I am SO glad I did it!!
As a fellow beginner, I wanted to write this blog post to help you feel fully prepared, even if you have 0 hiking experience! Without further ado, let’s get into this Beginner’s Guide to Hiking the Narrows!
A Beginner’s Guide to Hiking the Narrows in Zion National Park

Must Knows About the Narrows
Out and Back Hike
It’s important to know that the Narrows is an out and back hike. This means, however far in you hike, you will have to cover the same distance going back.
This is nice because you can control the length of your hike! Just remember, if you hike 5 miles in, you have to hike 5 miles back out, and you will be TIRED! It’s important to keep this in mind while hiking in and not over do it.
Toxic Algae Bloom
Another important thing before hiking the Narrows is that the Virgin River often experiences Toxic Algae Bloom throughout the year. While you can still hike the Narrows if there’s an Algae Bloom (we did), it’s important to be aware of it, and avoid getting the water in your eyes, nose, or mouth.
Wash your hands before eating and of course DON’T drink the water!
Narrows Availability
As mentioned, the Narrows hike is through the Virgin River, so the flow of the river is constantly monitored and is important to know before you start your hike.
If one of your main reasons for visiting Zion is to hike the Narrows, you should avoid visiting between March and May. Water levels during this timeframe are typically too high to safely hike through the Virgin River. During the summer, the flow of the river is normally ideal for hiking, but flash floods can be common during this time.
Always make sure to talk to a park ranger before hiking the Narrows to make sure it is safe! The best time to hike the Narrows is late summer/early fall! By this time, summer crowds have subdued, and the weather is typically perfect!

A Little On Zion
Before we get too far into this Beginner’s Guide to Hiking the Narrows, I wanted to talk a little bit about Zion, as you are probably planning a trip to this legendary park! Zion National Park is located in the southwestern corner of Utah, just 2.5 hours from Las Vegas!
Zion is one of the most famous National Parks in the United States, typically getting over 4 million visitors each year. And for good reason! With epic hikes like the Narrows and Angels Landing, Zion National Park should be on everyone’s bucket list.
P.S. Are you planning a trip to Zion National Park? Make sure you check out my 10 Things You Need to Know Before Visiting Zion National Park!
How to Get There
You have many options in terms of getting to Zion National Park!
The closest airport is Harry Reid International Airport in Las Vegas (formerly McCarran Airport), which is 170 miles from the park and should take between 2.5 – 3 hours to get there.
It’s important to note, however, that Zion and Las Vegas are on two different time zones, with Las Vegas on Pacific Standard Time (PST) and Zion on Mountain Standard Time (MST), so you will lose an hour driving to Zion from Las Vegas! Make sure you factor this into your travel plans.

If you’re renting a car and driving, Zion is the perfect starting point for an epic road trip across the American Southwest! In addition to visiting Zion National Park, you can tackle Bryce Canyon, Grand Canyon, Canyonlands, Arches, and so many other national parks!
And if you’re planning a road trip, make sure to check out my One Week National Parks Road Trip itinerary! It’s the perfect itinerary if you have about 7 days and are trying to squeeze in as many parks as possible! Bonus points if you tackle the itinerary in an Escape Campervan like we did!
Here are the drive times from Zion to some other national parks nearby!
- Zion to Bryce Canyon: 1 Hr 15 Min
- Zion to Antelope Canyon: 2 Hrs
- Zion to Capitol Reef: 3 Hrs
- Zion to Grand Canyon: 3 Hrs 30 Min
Where to Stay
It’s important to note when planning a trip to Zion National Park that the options for staying inside the park are extremely limited and require planning way in advance. If you want to stay in a hotel/lodge, there is only one option – Zion Lodge! It is pricey and books up 6+ months in advance, so you have to plan ahead!
If you’re looking to camp, there are only 2 campgrounds inside the park, South and Watchman. Both require reservations ahead of time for the busy months and also book up fast!
While staying inside the park has its advantages (like not having to fight for parking), most people that visit Zion stay in the town of Springdale, UT. Springdale is right outside of the park’s entrance and has campgrounds, budget hotels, and upscale lodges– something for everyone!
Just expect to pay a premium the closer you are to the park’s entrance. I’d recommend trying to stay within a few miles so that you don’t have to drive too far every morning. You can check out the different options and read reviews on TripAdvisor below!
And if you don’t mind being a little bit further away, you should definitely look into some of the “glamping” options near Zion!
Before You Start Your Hike
What Gear You’ll Need
Before we get into how to get to the trailhead, let’s talk about what gear you are going to need hiking the Narrows, as it differs by time of year. Plus, not having the proper gear will make this hike miserable. Luckily, there is a company right outside the Zion entrance that has everything you will need – Zion Outfitter.
The employees of Zion Outfitter will be able to tell you exactly what you will need for hiking the Narrows depending on the time of year! Here is their current pricing for gear (as of March 2022):
Because you will be starting your hike so early (before Zion Outfitters opens), you will need to pick up your gear the day before your Narrows hike. The typical pick-up window is after 3pm the day before your hike.
So, if you’re planning to hike the Narrows your first day in Zion, I would try to re-arrange your schedule. We hiked Angel’s Landing on our first day, picked up our Narrows gear after lunch, and tackled the Narrows on Day 2!

Now, let’s talk about the actual gear you will need and why. No matter what time of year you are visiting, I highly recommend renting the shoes, socks, and walking stick. You might be thinking.. a walking stick… really?! But let me explain!
A majority of this hike is through the Virgin River, and the bottom of the river is mostly large rocks and boulders. It feels like walking on slippery bowling balls! Without the proper shoes, you may find it very hard to walk and could even roll your ankle.
As someone who trips over my own two feet, I was so happy to have the right shoes and the walking stick! The walking stick basically acts as a third leg and helps you keep your balance as you wade through the river. It saved me from face-planting into the water multiple times, so I highly recommend renting one!!
As for the socks, they are basically rubber boots that are extremely tight around your ankles to ensure the water doesn’t float up into your pants. So, your feet will be wet but nothing else will be!


Depending on the time of year, this might be all the rental gear you need! But if you’re visiting in the early spring or late fall, you might want some additional gear that will help keep you warm. When we hiked the Narrows, it was a very chilly October day.
The air temperature was probably 50 degrees when we started the hike, and the water was VERY COLD. Because of these conditions and the current flow of the river, it was recommended that we also rent waterproof pants.
While they’re not the most stylish pants ever, they are secured into your dry socks and will keep your lower half dry as you wade through the river.
This is SO important in order to enjoy your hike – you don’t want to be soaking wet and cold. Now if you’re visiting in the summer when temperatures often hit 100+ degrees, you probably will find the water refreshing on your skin and won’t mind being wet. If you’re unsure of what to rent, the employees at Zion Outfitter will be able to help you decide!
What to Pack
In addition to the rented gear, there are some other essentials you will need for hiking the Narrows. Like most hikes in Zion, there is no water, food, trash cans, or bathrooms once you make it past the trailhead. As this is an out and back hike, you control how long and how far you will be hiking.
Make sure you have enough water plus extra for however long you plan to hike for. You cannot drink the river water due to the toxic algae blooms. I brought this small daypack with me when hiking the Narrows, and it was perfect!
With the water bladder, you can carry 2 liters of water and don’t have to worry about holding a water bottle. This really came in handy as you want to have both hands free (one on your walking stick!) in case you need to catch yourself! I highly recommend purchasing this backpack or something similar for your trip to Zion.
Inside your backpack, you should also bring a packed lunch and enough snacks to last for the entire day. I also recommend the following:
- Sunscreen (Not just if you are visiting in the summer! The sun is strong in the desert. My favorite sunscreen is Supergoop – it goes on silky smooth, and you will forget you are even wearing it!)
- A Wide Brimmed Hat (Along with the above, a hat is the best protection for your face against the sun. You’ll be happy you have it! I got this cute bucket hat for our trip, but a baseball cap will work too!)
- Good sunglasses (Important for the sun reflecting off the water!)
- Portable charger (I like having a small charger like this one for emergencies!)
I always plan for the worst when hiking and bring extra food, extra water, and extra phone juice in case something happens!
As always, make sure you practice Leave No Trace principles while hiking the Narrows! If you’re not familiar, Leave No Trace is a program that encourages everyone to enjoy the outdoors responsibly and ensure it is protected for generations to come!
A large part of Leave No Trace is disposing of waste properly (pack in, pack out). For example, if you bring a lunch on a hike with you, you should pack all trash and dispose of it properly once you are able to.
This doesn’t just mean plastic and trash, but food remains like apple cores, banana peels, etc. It’s so important to practice Leave No Trace to protect the Narrows for future generations to enjoy!
Getting into the Park & to the Trailhead

Parking in Zion
Alright, so you picked up your gear yesterday and today is the day you are Hiking the Narrows!! If you’re staying outside the park, you’ll need to make your way to the Zion Visitor Center in order to catch the Zion shuttle.
Depending on where you are staying, you might be driving into the park or walking in. Some places in Springdale are close enough to walk! But if you’re driving, you need to get into the park as soon as it opens.
The parking lot for the Visitor Center fills up EXTREMELY quickly, and if you can’t get a spot, you’ll have to pay to park outside the park.
In order to secure a parking spot, plan to catch the first bus leaving the visitor center and arrive at the park entrance 15-30 minutes before that shuttle leaves. Trust me when I say this hike is worth waking up early for, not only to secure parking but also to make the hike itself more enjoyable.
Don’t forget you need a Recreational Pass to enter Zion National Park! If you’re arriving around or before park open, you may not need to show your pass (there may not be anyone at the park entrance stations) but I wouldn’t plan on this!
Make sure you have your entrance pass. If you’re visiting more than one national park on your trip, I highly recommend an America the Beautiful Pass! For $80, you and other person get access to an extensive amount of national and state parks throughout the country for a whole year.
And the pass is used per vehicle. So if you’re taking a trip with one person now, and then with another group later in the year, you can still use the pas! Most national park entrance fees are ~$30, so if you’re planning to visit more than 2 in one year, it’s worth it to buy the America the Beautiful Pass!
Riding the Shuttle
Once you’ve arrived at the Visitor Center (by foot or by car!), you will need to board the Zion Shuttle if you are visiting between February and November. During this time of year, the main road in Zion, the Zion Canyon Scenic Drive, is closed to all recreational vehicles.
The only options to get to most of the trailheads are to walk (not recommended for the Narrows!), bike, or take the shuttle. Below is a map of the shuttle bus stops!

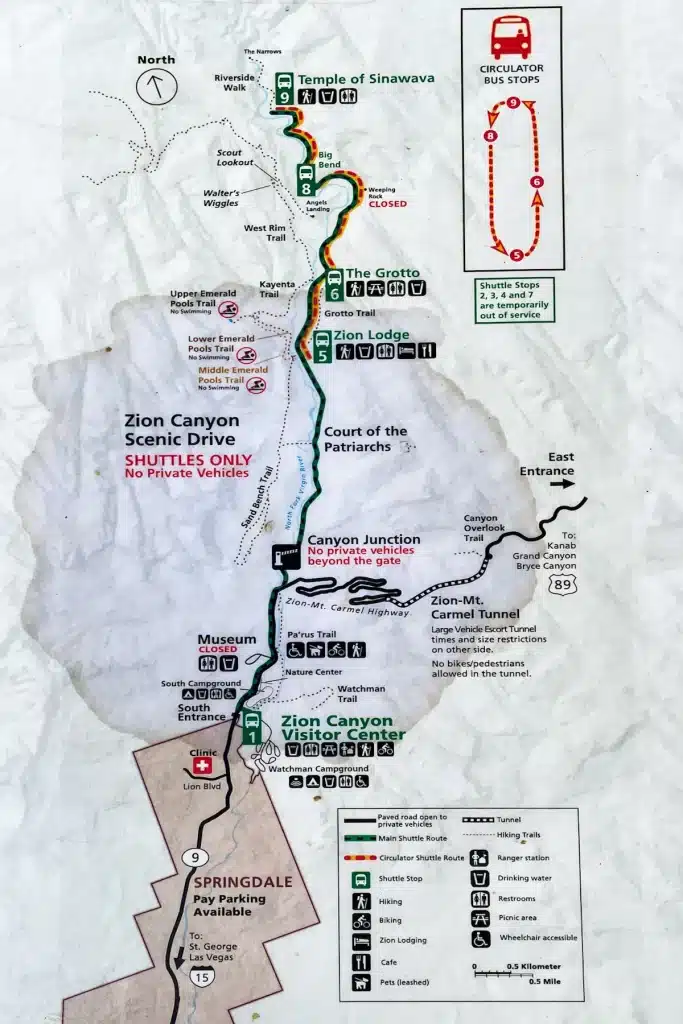
To reach the Narrows, you will ride the shuttle bus to the last stop, Temple of Sinawasa! It’s about 25 minutes from there to the Visitor Center. After getting off the bus, follow the signs and crowds towards the river walk.
You will have to walk about a mile along the river path before even entering the water! This is technically the first portion of hiking the Narrows: it’s called the Riverside Walk.
During the summer especially, this area will likely be extremely crowded on your hike back, with people swimming in the river! It is a gorgeous part of the park that can be enjoyed even without hiking the Narrows. In fact, I highly recommend coming back here if you have a few extra days in Zion!
After about 45 minutes, you will reach a set of stairs that lead into the river. Now the fun begins!
The Hike Itself
Into the Water You Go!
As you start your hike, the water will probably be around ankle deep and will transition from water to dirt paths and back again. The best part of hiking the Narrows is that you can really forge your own path. Some areas there is only one path to walk on, but in general, you can choose where to cross the river and where to hike on the land. It’s fun to explore on your own through the river and test yourself!
In general, the trail is not too physically challenging (much easier than Angels Landing in my opinion!) The most difficult part is making sure not to slip while in the river, which is where the walking stick comes in handy!
The river height changes as you continue through the trail. Some parts might be up to your waist, sometimes just to your calves, it all depends on the flow of the river and the time of year, which is what makes the trail so fun!


As you journey through the river, there will be some areas here and there with dirt paths, tall grasses, and rocks to rest on. We stopped about an hour in to have some water and a snack.
As I mentioned, there are no bathrooms at all on this hike. We saw some people hiding behind some bushes to do their business – that’s about your only option! So keep that in mind before starting the hike.
Like I mentioned before, the Narrows is an out and back hike, meaning you can choose how far you want to hike. Just remember, however far you hike in, you will have to hike that far back, and you will be tired!!
Without a permit, the furthest you can hike is to Big Springs, which is 5 miles in. Most people try to make it to Wall Street, which is about 3 miles in and offers some of the most impressive views of the canyon walls.
It took us about 2.5-3 hours to make it to Wall Street, and it was so worth it! I highly recommend trying to make it here if you can.

The Journey Back
We hiked for about 30 minutes past Wall Street and then turned back. The one thing we noticed was how much busier it was hiking back! During our hike in, there were portions where we were the only ones within sight – it was lovely!
On the hike back, there were people everywhere!! This is a big reason why I recommend starting this hike early. The earlier you start, the less people there will be, and the more serene hiking the Narrows will be.
Another thing we noticed was there was surprisingly a lot of children on the hike later in the day. Again, just an observation, so if you’re looking for peace and quiet, start early!
I will say, if one of your main reasons for hiking the Narrows is for photography purposes, it may be worth waiting until later in the day. A lot of our pictures came out mediocre due to starting so early. Of course, these were iPhone photos!
But due to the high canyon walls, the sun doesn’t start to shine in the canyon until around noon. At that time, the lighting was absolutely gorgeous as it illuminated the walls of the canyon!
So, if your primary goal is photographing the canyon, it may be worth fighting the crowds and starting the hike later in the day. Of course, going on a weekday instead of the weekend will also help with crowds!


Finishing Up
As you hike back, continue following the river back to the start of the hike where you entered the water! There will probably be a lot more people here now. Don’t forget you still have the one-mile hike back to the shuttle stop as well!
From here, you’ll probably want to get out of the hiking shoes and take a shower. Take the shuttle to the Visitor Center and head back to Zion Outfitters to return your gear. There will be buckets where you drop everything off, and that’s it! No need to check in with the staff or anything.
Depending on how long it took you to the hike the Narrows, you may want to grab lunch (or dinner!). There are some great places within walking distance of Zion Outfitters that you can check out.
After we dropped off our gear, we desperately needed coffee and headed over to Free Love Coffee, which is walking distance from the park entrance.
We actually went here multiple times on our trip because their coffee was SO good! If you have some time left in the day, I recommend just driving through the east side of the park (which you can drive through!), and soak in the gorgeous views of Zion with some good music and good coffee!

Final Thoughts
Well that wraps up my Beginner’s Guide to Hiking the Narrows! I hope you feel a little more prepared than before you started reading! Even though this hike is categorized as “difficult”, I promise you can handle it!
Again, don’t forget to rent the recommended gear, get there early, and have fun!
If you enjoyed this Beginner’s Guide and want to see more of the area in style and comfort, don’t forget to check out my guide to renting and Escape Campervan!
Read my other blog posts about Zion, Grand Canyon, and Antelope Canyon below!
ULTIMATE Grand Canyon, Zion, and Bryce Canyon Road Trip
How To Spend One Day In The Grand Canyon (Ultimate One Day Itinerary)
Kayaking To Antelope Canyon: A Detailed Guide
Zion National Park To Antelope Canyon: Mini Road Trip Guide
10 Things You Need To Know Before Visiting Zion National Park
Zion National Park Itinerary: How To Spend 3 Perfect Days In Zion
A Beginner’s Guide To Hiking The Narrows In Zion National Park
Hiking Angels Landing: A Beginner’s Guide
Renting An Escape Camper Van: Everything You Need To Know
Don’t forget to pin this post for future planning!


Copyright © 2021 Adventures by Lana
Save this post for later!
All Rights Reserved